Marvelous Designer offers a deal to Sansar users to use their software for a 2 month trail. Using this version provides the user the build-in option to export a rigged piece of clothing to be exported into Sansar. This provides the maker and customer with cloth simulation in the Look-book inside Sansar. After adjusting the cloth, it gets baked (gets static). Future Sansar updates may include real time simulation but are not yet confirmed (could not find how to activate, pls edit if you do). For now it does have some bugs but you can find a lot of information and some help on the Discord channel.
Current know bugs and problems for Samd files:[]
- Poor edge padding/bleed.
Avatar Related:[]
Advised skin offset for the avatar in MD: 3.00 mm. Find this in the Scene tab. 3D Simulation > Avatar > click Sansar_female or male to adjust the offset in the Property Editor.
In MD you do not need the avatar template, you can load it in MD by clicking File > Open > Avatar and scroll down to the Sansar avatars.
Free Templates and Blocks is here >[]
How to have transparency []
First read this article in the MD forum,"The Sansar File Format "https://www.marvelousdesigner.com/community/forum/ShowoffandLearn/10409
1) Unpack the samd file and add the transparency to the diffuse file.
2) At import in Sansar click Material Setting
3) Choose the "Standard + Alpha Mask" format. (#3 in the list)
____________________________________________________________________________________________
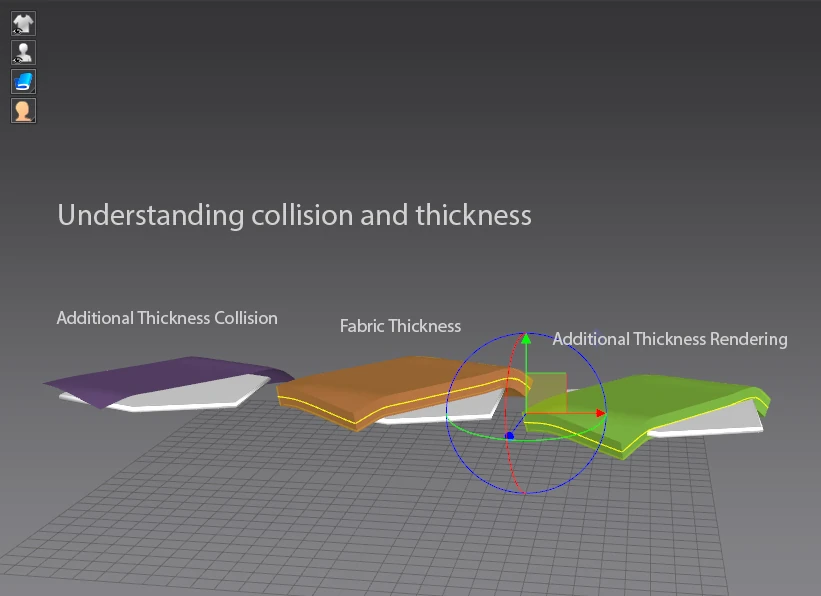
Understanding collision and thickness, how to make padding[]
Only Additional Thickness Collision works, The other two do not transfer to Sansar.
Padding example.[]
Usuing "Additional Thickness Collision" (with a 10 mm distance in this case)
1) Cut & Sew (Using the Line 3D pattern tool.) the area where you want the padding
2) Make a copy with "Layer Clone (over), and then "Remove Linked Editing" This will be the padding
3) On the padding, "Offset Pattern Outline" (10 mm)
4) With the Trace Tool, select the baseline that is left - Cut & Sew
5) Select the padding and set "Additional Thickness Collision" to the same as 3) (10 mm)
6) Freeze the whole garment except the padding and simulate
Experiment with pressure. You can try with both positive and negative value.
Before you load the padding garment in Look room, freeze all the paddings (collect all the padding pieces at one place so they can be selected in one sweep).[]
In the Look room, load first time, start the simulation and load a second time)
Here is how it looks like (using the bodysuit in free samples):